django rest framework , django , aws , s3
In this blog of 3 part series, We are learning how to set up static and media files inside your Django application. Then in the upcoming blog, we will configure Amazon S3 (Simple Storage Service) to store and serve static and media files.
Table of contents
- What is Amazon S3?
- Building a small Django application for uploading images
- Create an S3 Bucket (Part 2)
- AWS IAM (Identity and Access Management) (Part 2)
- Configure our Django app with AWS settings (Part 3)
- Summary (Part 3)
What is Amazon S3?
Amazon Simple Storage Service (Amazon S3) is an object storage service that offers industry-leading scalability, data availability, security, and performance. You can use Amazon S3 to store and retrieve any amount of data at any time, from anywhere.
To get the most out of Amazon S3, you need to understand a few simple concepts. Amazon S3 stores data as objects within buckets. An object consists of a file and optionally any metadata that describes that file. To store an object in Amazon S3, you upload the file you want to store to a bucket. When you upload a file, you can set permissions on the object and any metadata.
Buckets are containers for objects. You can have one or more buckets. For each bucket, you can control access to it (who can create, delete, and list objects in the bucket), view access logs for it and its objects, and choose the geographical region where Amazon S3 will store the bucket and its contents.
Building a Django application
In this section, we are going to set up the media and static files within Django.
1. Create and access a directory for our project
	mkdir aws-image-upload
	cd aws-image-upload
2. Now run the following command to create a virtual environment.
3. python -m venv venv where venv is the name we give to our environment
4. Once created you can activate it using venv\Scripts\activate
5. For Mac OS /Linux, use the following command to activate the virtual environment source venv/bin/activate
6. That's all! Now we have created a virtual environment created for our project
7. To deactivate the virtual environment you must run deactivate
Install Django and Django Rest Framework
1. Before installing, any library makes sure your virtual environment is activated.
2. From the aws-image-upload folder and with the virtual environment enabled to run the following commands:
pip install django djangorestframework pillow
3. From this point on, make sure you are in the project directory aws-image-upload and that the virtual environment is activated while executing commands.
4. From the command line, cd into a project directory where we are going to store our code, then run the following command in the command
prompt/terminal:
django-admin startproject app .
5. Create an application inside your main directory.
python manage.py startapp blog
6. Now add the following configuration inside settings.py
INSTALLED_APPS = [
  "django.contrib.admin",
  "django.contrib.auth",
  "django.contrib.contenttypes",
  "django.contrib.sessions",
  "django.contrib.messages",
  "django.contrib.staticfiles",
  "rest_framework",
  "blog",
]

STATIC_URL = "/static/"
STATIC_ROOT = os.path.join(BASE_DIR, "static")
MEDIA_URL = "/media/"
MEDIA_ROOT = os.path.join(BASE_DIR, "media")
7. Add the code snippet below to the urls.py file in the app project directory.
from django.conf import settings
from django.conf.urls.static import static
from django.contrib import admin
from django.urls import include, path

urlpatterns = [
    path("admin/", admin.site.urls),
    path("api/v1/blog/", include('blog.urls')),
]

if settings.DEBUG:
    urlpatterns += static(settings.MEDIA_URL, document_root=settings.MEDIA_ROOT)
    urlpatterns += static(settings.STATIC_URL, document_root=settings.STATIC_ROOT)
8. Now we will create Blog models in models.py
from django.db import models


class Blog(models.Model):
    title = models.CharField(max_length=255)
    sub_title = models.CharField(max_length=255)
    banner_image = models.ImageField(max_length=255, upload_to='blog')
    content = models.TextField()
    is_publish = models.BooleanField(default=False)
    is_featured = models.BooleanField(default=False)
    created_at = models.DateTimeField(auto_now_add=True)
    updated_at = models.DateTimeField(auto_now=True)

    def __str__(self):
        return self.title
9. Add the code snippet below in serializers.py
from rest_framework import serializers

from blog import models


class BlogSerializer(serializers.ModelSerializer):

    class Meta:
        model = models.Blog
        fields = [
            "id",
            "title",
            "sub_title",
            "banner_image",
            "content",
            "is_publish",
            "is_featured",
            "created_at",
            "updated_at"
        ]
10. Add the code snippet below in views.py
from rest_framework import viewsets

from blog import models, serializers


class BlogViewSet(viewsets.ModelViewSet):
    queryset = models.Blog.objects.all()
    serializer_class = serializers.BlogSerializer
    http_method_names = ["get", "post", "put", "patch", "head", "delete"]
11. Add the following code to the blog's urls.py
from django.urls import include, path
from rest_framework import routers
from blog import views


router = routers.DefaultRouter()
router.register('', views.BlogViewSet, basename='blog')

urlpatterns = [
    path('', include(router.urls), name='blogs')
]
12. To create a table in the database from the model that we created above, execute the command below.
  python manage.py makemigrations
  python manage.py migrate
13. Start the development server by executing the command below:
python manage.py runserver
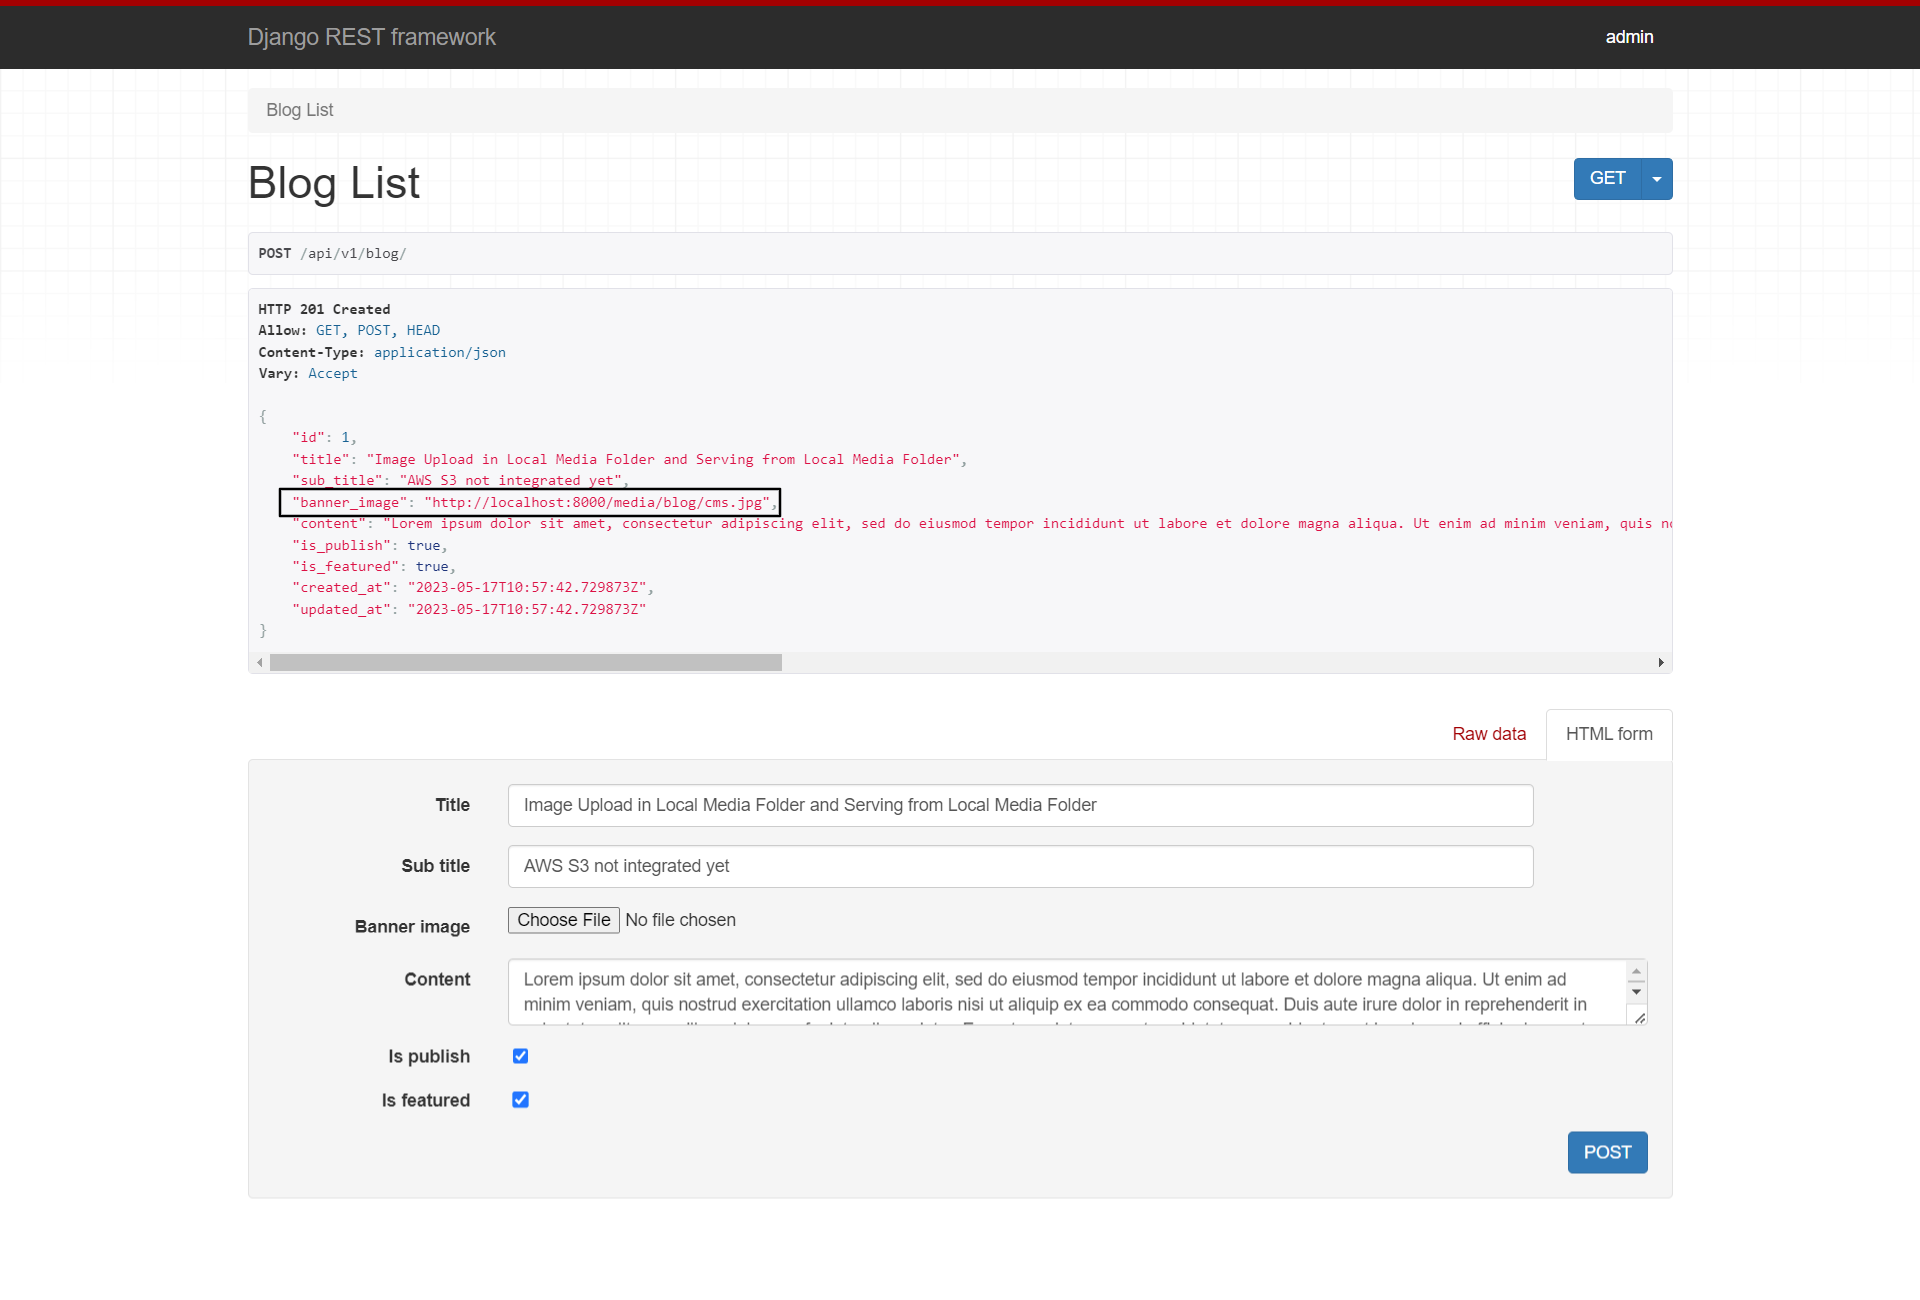
14. When we hit the Post API endpoint http://localhost:8000/api/v1/blog/ using Django BrowsableAPI inside any browser with appropriate data, we get the following output:
Look at a black rectangle, banner_image is stored and served from the media folder which is inside your aws-image-upload directory.
15. For static files run a command in the terminal
python manage.py collectstatic
this will create a static folder inside your project directory and serve static files (.css, .js) from it.
16. Now We have a working application where we can store in and serve static and media files from the project directory. In the next section, we will configure our application to store and serve static and media files from Amazon s3.
Oxvsys Automation has expertise in AWS S3 and a deep understanding of various cloud technologies. We have extensive hands-on experience working with AWS S3, the cloud storage service offered by Amazon Web Services.
Oxvsys has not only utilized AWS S3 for storing and managing assets but has also written a series of insightful blog posts on various cloud technologies. Our blogs cover a wide range of topics related to cloud computing, including AWS S3 best practices, data management strategies, cost optimization techniques, and integration with other AWS services.
Contact us today or schedule a call via Calendly
Stay tuned for the next part of the Django AWS S3 blog series